By Joe Weir
I’m obsessed with crushing grip strength. Most people don’t know there are different types of grip strength. For example, the grip strength you need to hold onto a heavy barbell is supporting grip strength. This is needed anytime you hold something in your hand for a long period of time. There is also pinch grip strength. Then there’s the type of grip strength responsible for a strong handshake. The kind of strength used to, essentially, ‘crush’ things. This is crush grip or crushing grip strength.
Also, see Guide to Heavy Gripper Training Part 2 – Buying a Gripper
Training crushing grip is done mostly through the use of heavy hand grippers, also called torsion spring grippers. Training with them can become a strength obsession all its own, as it has with me. To satisfy this obsession, I’m going to lay out a guide for torsion spring grippers. I’ll make it as comprehensive as I can and it will contain information for people with and without experience with grippers.
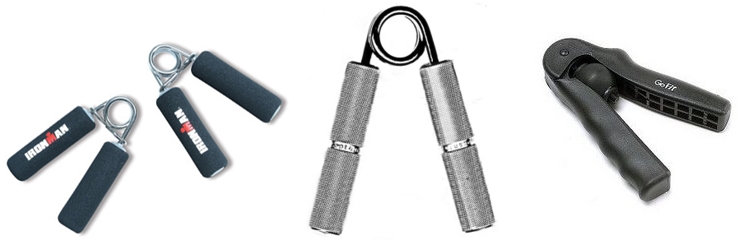
First things first, below are a few torsion spring grippers. They are used to develop crushing grip strength but can also be used for supporting grip by using static holds or using strap pinches. From left to right, we straight gripper, a Captains of Crush (COC) gripper, and an ergonomic gripper.
Below is a list of the Iron Mind Captain’s of Crush grippers and their resistances. Now, not everything has to be done with a CoC gripper, but these numbers are a good way to describe your ‘level’ of grip strength and will be especially helpful when I refer to what resistances you should be looking at getting. The following list describes the different levels of CoC grippers, their resistance in pounds, and notes on training.
-
- The Guide (60 lbs) Lowest resistance gripper, yet still ~twice the resistance of a standard sporting goods gripper. Just about anyone can close these for reps.
- The Sport (80 lbs) Slightly stronger than the previous one, should be easily closed by most people.
- The Trainer (100 lbs) Entry level gripper. Anyone with some resistance training background will probably be able to close this for reps. An average person without resistance training experience may be able to close this for a few reps.
- #1 (140 lbs) This is the first breaking point, so to speak. Anyone with some moderate experience in the weight room may be able to close this gripper. After this one, the gripper becomes a serious challenge.
- #1.5 (167.6) This bridges the gap between the resistance of a No. 1 and a No. 2. Since the jump from 1 to 2 can be quite difficult this can help you progress to the next level a bit easier.
- #2 (200 lbs) This is where the going gets really tough. It takes some actual grip training to be able to close this gripper.
- #2.5 (237.5 lbs) Another bridge between numbers, except this time the difference between the lower and upper gripper is more pronounced and much more difficult.
- #3 (280 lbs) To be able to close this gripper is actually quite a feat of hand strength. This is at the strongman competitor level of grip strength, and we all know how strong those guys are.
- #3.5 (322.5 lbs) If you’re going to close the No.4, you’re going to need all the help you can get. The progression from a 3 to a 4 is the highest (85lbs).
- #4 (365 lbs) Ironmind reports that 5 people have officially closed the No. 4 gripper. It is truly a feat of hand strength to close this gripper.
After reading this list you may be saying the same thing as I did when I first saw these, holy crap it takes 365lbs to close the No. 4! While the No. 4 takes legendary strength to close, the ratings on grippers are really nothing more than an indication of how tough they will be. Since there is no standard method for evaluating a grippers resistance it should be taken as nothing more than an idea of how challenging it will be. The main thing is that you train with a consistent set of grippers, as progress is really all that matters.

Beginner Gripper Training
If you’re brand new or relatively new to the world of grippers then this section is for you!
I’m sure most of you have seen grippers sold in sporting good stores or even Wal-Mart. Typical department or sporting goods store grippers are usually around 30lbs resistance and even if you buy a package of 2 identical ones, they can vary by a few lbs.
You don’t necessarily have to go with the CoC grippers and a good alternative is the Iron Woody Bonecrusher. They’re about half the price, start as low as 100lbs and go as high as 400 and 500lbs of resistance! (Remember what I said about those numbers though)
I’m not suggesting you go out and buy a whole whack of grippers but I will suggest that you get one of those weaker grippers from Wal-Mart (or wherever). A weaker gripper will help you learn to set a gripper and can also be used as part of your warmup. You want to avoid the ergonomic style grippers, however, and go with a straight-handled gripper. Ergo grippers are not good for learning to set a gripper and some of them can be awkward to use and even painful, depending on how well they fit your hand.
From what I have read and from my own personal experiences with myself and others, an average person can close a ‘trainer’ level (100lbs) gripper for a few reps. I would suggest purchasing one of those as well. You will also want another gripper that you can do for only a single (or even barely) or a couple reps so that you have something to work towards. I would recommend something in the No. 1 range of 140lbs.
Having a variety of challenging grippers will not only keep you interested in grip training but will also give you some realistic goals to set.
Just because it is grip training does not mean that you don’t need to perform a proper warmup and it doesn’t mean you need to be able to close the gripper 8000 times. We will be doing a proper warmup. Typically I will close a weaker gripper for a couple sets of 10, move onto the next level gripper for 2-3 sets of 2-3, an intermediate gripper for a 2-3 1 rep sets and then perform some maximal work with my heaviest gripper. A warmup should get you ready and acclimated but not fatigue grip strength so that it impacts the session. And we will be doing sets of 1 or 2 reps with the heaviest gripper, maybe not even a full rep at the start.
If you find that you can close all of your grippers easily for 10 full reps then it is probably time for the next resistance level. If you cannot close your highest resistance gripper, its ok, try and close it as much as you can and take note (or even measure) of the gap you need to close. On the next session, you can measure the gap again and measure your progress by seeing how much you are able to decrease that gap. Partial reps are also a good tool as well. Closing a tough gripper for three 1/2 reps is still better than not trying to close it. You’re still working your grip after all.
This training is the same as barbell and dumbbell strength training. We want quality reps and low volume, with good ROM and technique. This should always be kept in mind when doing grip training, especially when you start to move into the higher level grippers. Its just like anything else, because you deadlifted a heavy weight does not mean you are a good deadlifter, form and technique count especially if you want to do this for the long haul.
The absolute worst thing to do is sit there and do hundreds of reps with a weak gripper. At the very least you will wear out the gripper prematurely and have a sore hand. We also want to work the hand extensors, using some sort of a band(s) or other means of resistance.
WARNING: This can get very addictive so keep this in mind and try to minimize the impact that this has on your normal training.

Intermediate Gripper Training
I won’t go much into this stuff because I’m not terribly advanced myself, but I will share some tips and tricks that make progression easier for those higher number grippers.
By this stage you should be working on the No. 2 level gripper, maybe you can close if for a few reps or more. The jump from the No. 2 (200lbs) to the No. 3 (280lbs) is pretty huge and very difficult. You can always buy an intermediate gripper (around 240lbs) but that can be an expensive stepping stone.
Here is a list of things that have helped me or others.
Strap Grips
For this one you’re going to take a wrist strap or something similar, it doesn’t matter much so long as it is flat, and attach it to a weight plate. Bring one end of the strap through the plate and then through the loop. Now take a gripper that you can close, set it, and place the free end of the strap in between the handles and close the gripper, suspending the weighted strap.
Banded Grips
Similar to the strap grip but with a twist. Instead of a weighted strap you’re going to use a resistance band such as one of these POWER GUIDANCE Heavy Duty Resistance Bands. Anchor one end of the band, you’ll want to do this so that the band reaches the height of the closing hand with a bit of slack, you’re going to set the gripper again, place the band in between the handles and close the gripper. Once the gripper is closed, lift your hand up (as if you’re doing a bicep curl) until you put tension into the band. You’ll want enough tension so that it will almost begin to slip out of the handles but not so much that it does come out.
I would recommend doing this with an old band as the handles may damage the rubber or you can use another medium to wrap around the band to protect it.  Monitor the Gap!
Similar to what I said in the beginner section, it doesn’t matter that you can’t close the gripper, it only matters that you’re getting closer and closer to closing it. Sometimes the most frustrating thing is missing that last 1/8th or 1/16th of an inch. When you get very close to closing a gripper but not quite there, you can get an official gap measuring tool from Ironmind but I have a few cheaper alternatives. You can always use a ruler or a tap measure, but that can be difficult while you’re trying to sustain a partially open hand. You can use a spark plug gapper for those really really close closes or you can use my personal favorite, silly putty!
Yep, that’s right. Because it doesn’t dry out or tear easily and can be repeatedly molded to any shape it is perfect for this. What I do is take a piece of silly putty that is appropriate in thickness, when compared to the gap I have left, and I make a small strip at the bottom of the handle in your hand and facing the other handle. When I close the gripper the silly putty conforms to the shape of the handle and what you get is the exact impression of both handles in their closest position. You get the smallest gap created during that attempt as if it were a still picture. You can then take that and measure it with a ruler or caliper and not have to worry about measuring and squeezing. You can also save the piece from previous sessions, since you use so little, for a direct comparison.
Wrap it up
Take a gripper that can be closed with some effort and wrap some cloth or tape around the handles. Increasing the handle diameter will force your hand into a more open position, but it will also decrease the gap a little bit making it less of a closing distance. To get around this you can use tape ONLY on the sides where your hand is contacting the gripper handle. Obviously, you will need to either use quite a bit of tape or tape something to that part of the handle, the result is more important than the method but so long as it is not extremely soft, to the point where your hand sinks into the ‘padding’ it is fine. This method is also good for supporting grip, especially if you don’t have any thick barbells.
My last piece of advice is for beginners and experienced ‘grippers’. Chalk can be a great asset for anyone, beginner or otherwise. Nothing will put a stop to your grip training faster than a painful blister or skin irritation. I’ve had some real good ones trying to do some max effort closes with a slightly sweaty hand, the friction will eat your hand alive. Chalk will save you the pain and downtime and can be easily removed from the gripper with a bristled brush. If you don’t have chalk, you might want to look into getting a few ounces.
With this information, you are all set to explore the world of grippers. Grip training can be extremely fun and it is very flexible so I encourage everyone to experiment and find what is effective for you.
I’m currently writing up another article related to setting a gripper, where I’ll go into deep sets, credit card sets, the dogleg, etc. For now, check out second part of this article, Guide to Heavy Gripper Training Part 2 – Buying a Gripper.